Manage data in Docker
By default all files created inside a container are stored on a writable container layer.
-
The data doesn’t persist when that container no longer exists, be difficult to get the data out of the container.
-
A container’s writable layer is tightly coupled to the host machine where the container is running.
-
Writing into a container’s writable layer requires a storage driver to manage the filesystem. This extra abstraction reduces performance as compared to using data volumes.
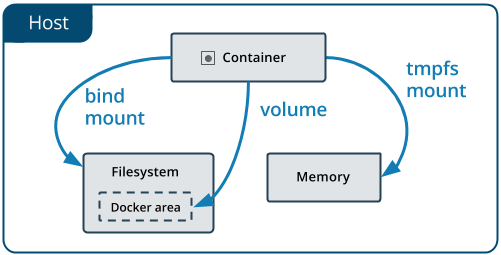
Docker has two options for containers to store files in the host machine: volumes, and bind mounts.
-
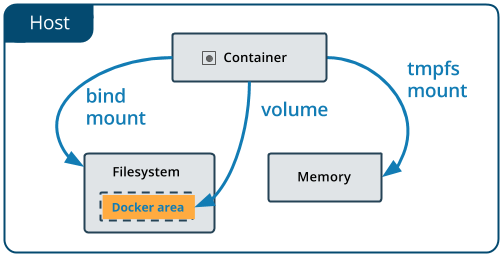
Volumes are stored in a part of the host filesystem which is managed by Docker (
/var/lib/docker/volumes/on Linux). Non-Docker processes should not modify this part of the filesystem. Volumes are the best way to persist data in Docker. Created and managed by Docker withdocker volume create.-
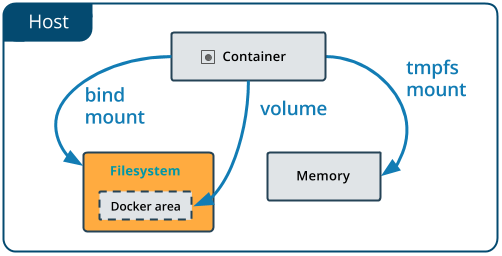
Bind mounts may be stored anywhere on the host system. They may even be important system files or directories. Non-Docker processes on the Docker host or a Docker container can modify them at any time.
-
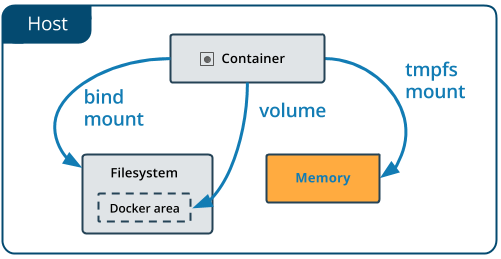
tmpfsmounts are stored in the host system’s memory only, and are never written to the host system’s filesystem.
-
在 Linux 的 /var/lib/docker/volumes/ 目录下,有对应的每个 volume 的目录。
|
In Docker 17.06 and higher, we recommend using the --mount flag for both containers and services, for bind mounts, volumes, or tmpfs mounts, as the syntax is more clear.
Good use cases for volumes
-
Sharing data among multiple running containers.
-
When the Docker host is not guaranteed to have a given directory or file structure.
-
When you want to store your container’s data on a remote host or a cloud provider, rather than locally.
-
When you need to back up, restore, or migrate data from one Docker host to another, volumes are a better choice.
Good use cases for bind mounts
-
Sharing configuration files from the host machine to containers.DNS resolution to containers by mounting
/etc/resolv.conf. -
Sharing source code or build artifacts between a development environment on the Docker host and a container.
-
When the file or directory structure of the Docker host is guaranteed to be consistent with the bind mounts the containers require.
tmpfs mounts are best used for cases when you do not want the data to persist either on the host machine or within the container.
volumes
Volumes are the preferred mechanism for persisting data generated by and used by Docker containers.
-
Volumes are easier to back up or migrate than bind mounts.
-
You can manage volumes using Docker CLI commands or the Docker API.
-
Volumes work on both Linux and Windows containers.
-
Volumes can be more safely shared among multiple containers.
-
Volume drivers let you store volumes on remote hosts or cloud providers, to encrypt the contents of volumes, or to add other functionality.
-
New volumes can have their content pre-populated by a container.
A volume does not increase the size of the containers using it, and the volume’s contents exist outside the lifecycle of a given container.
Volumes use rprivate bind propagation.
rprivate 是什么鬼?
|
In general, --mount is more explicit and verbose. The biggest difference is that the -v syntax combines all the options together in one field, while the --mount syntax separates them.
If you need to specify volume driver options, you must use --mount.
-
-vor--volume: Consists of three fields, separated by colon characters (:). The fields must be in the correct order.-
The first field is the name of the volume, and is unique on a given host machine.
-
The second field is the path where the file or directory are mounted in the container.
-
The third field is optional, and is a comma-separated list of options, such as
ro.
-
-
--mount: Consists of multiple key-value pairs, separated by commas and each consisting of a<key>=<value>tuple.
When using volumes with services, only --mount is supported.
# Create a volume:
$ docker volume create dgg-vol


# List volumes:
$ docker volume ls

# Inspect a volume:
$ docker volume inspect dgg-vol
[
    {
        "CreatedAt": "2019-03-31T15:56:58Z",
        "Driver": "local",
        "Labels": {},
        "Mountpoint": "/var/lib/docker/volumes/dgg-vol/_data",
        "Name": "dgg-vol",
        "Options": {},
        "Scope": "local"
    }
]

# Remove a volume:
$ docker volume rm dgg-vol


$ docker run -d
    --name devtest \
    --mount source=dggvol2,target=/app \
    nginx:latest

$ docker inspect devtest

$ docker container stop devtest
$ docker container rm devtest
$ docker volume rm dggvol2


$ docker service create -d \
    --replicas=4 \
    --name devtest-service \
    --mount source=dggvol2,target=/app \
    nginx:latest

$ docker service ps devtest-service

$ docker service rm devtest-service
The docker service create command does not support the -v or --volume flag.
$ docker run -d \
    --name=nginxtest \
    --mount source=nginx-vol,destination=/usr/share/nginx/html \
    nginx:latest

$ docker container stop nginxtest

$ docker container rm nginxtest

$ docker volume rm nginx-vol

$ docker run -d \
    --name=nginxtest \
    --mount source=nginx-vol,destination=/usr/share/nginx/html,readonly \
    nginx:latest

$ docker container stop nginxtest

$ docker container rm nginxtest

$ docker volume rm nginx-vol
Volume Driver
# On the Docker host, install the `vieux/sshfs` plugin:
$ docker plugin install --grant-all-permissions vieux/sshfs

# Create a volume using a volume driver
$ docker volume create --driver vieux/sshfs \
    -o sshcmd=test@node2:/home/test \
    -o password=testpassword \
    sshvolume

# Start a container which creates a volume using a volume driver
$ docker run -d \
    --name sshfs-container \
    --volume-driver vieux/sshfs \
    --mount src=sshvolume,target=/app,volume-opt=sshcmd=test@node2:/home/test,volume-opt=password=testpassword \
    nginx:latest

# NFSV3
$ docker service create -d \
    --name nfs-service \
    --mount 'type=volume,source=nfsvolume,target=/app,volume-driver=local,volume-opt=type=nfs,volume-opt=device=:/var/docker-nfs,volume-opt=o=addr=10.0.0.10' \
    nginx:latest

# NFSV4
$ docker service create -d \
    --name nfs-service \
    --mount 'type=volume,source=nfsvolume,target=/app,volume-driver=local,volume-opt=type=nfs,volume-opt=device=:/,"volume-opt=o=10.0.0.10,rw,nfsvers=4,async"' \
    nginx:latest`

# Backup a container
$ docker run --rm --volumes-from dbstore -v $(pwd):/backup ubuntu tar cvf /backup/backup.tar /dbdata (1)

# Restore container from backup
$ docker run -v /dbdata --name dbstore2 ubuntu /bin/bash (1)

$ docker run --rm --volumes-from dbstore2 -v $(pwd):/backup ubuntu bash -c "cd /dbdata && tar xvf /backup/backup.tar --strip 1" (1)

# To remove all unused volumes and free up space:
$ docker volume prune| 1 | 不是很清楚! |
docker plugin 是什么鬼?
|
bind mounts
Bind mounts have been around since the early days of Docker. When you use a bind mount, a file or directory on the host machine is mounted into a container. The file or directory is referenced by its full or relative path on the host machine.
Bind mounts are very performant, but they rely on the host machine’s filesystem having a specific directory structure available.
If you bind-mount into a non-empty directory on the container, the directory’s existing contents are obscured by the bind mount.
$ docker run -d \
    -it \
    --name broken-container \
    --mount type=bind,source=/tmp,target=/usr \
    nginx:latest (1)

docker: Error response from daemon: OCI runtime create failed: container_linux.go:344: starting container process caused "exec: \"nginx\": executable file not found in $PATH": unknown.

$ docker container rm broken-container| 1 | 为什么报错?难道是因为 /tmp 目录覆盖了 /usr 目录吗? |
$ docker run -d \
    -it \
    --name devtest \
    --mount type=bind,source="$(pwd)"/target,target=/app,readonly \
    nginx:latest

$ docker inspect devtest

$ docker container stop devtest

$ docker container rm devtest
Configure bind propagation
Bind propagation defaults to rprivate for both bind mounts and volumes. It is only configurable for bind mounts, and only on Linux host machines.
| Propagation setting | Description |
|---|---|
|
Sub-mounts of the original mount are exposed to replica mounts, and sub-mounts of replica mounts are also propagated to the original mount. |
|
similar to a shared mount, but only in one direction. If the original mount exposes a sub-mount, the replica mount can see it. However, if the replica mount exposes a sub-mount, the original mount cannot see it. |
|
The mount is private. Sub-mounts within it are not exposed to replica mounts, and sub-mounts of replica mounts are not exposed to the original mount. |
|
The same as shared, but the propagation also extends to and from mount points nested within any of the original or replica mount points. |
|
The same as slave, but the propagation also extends to and from mount points nested within any of the original or replica mount points. |
|
The default. The same as private, meaning that no mount points anywhere within the original or replica mount points propagate in either direction. |
| 这块不是很明白! |
For more information about bind propagation, see the Linux kernel documentation for shared subtree.
$ docker run -d \
  -it \
  --name devtest \
  --mount type=bind,source="$(pwd)"/target,target=/app \ (1)
  --mount type=bind,source="$(pwd)"/target,target=/app2,readonly,bind-propagation=rslave \ (1)
nginx:latest| 1 | 怎么查看这个 /app 和 /app2:docker exec -ti devtest bash。 Now if you create /app/foo/, /app2/foo/ also exists. |
If you use selinux you can add the z or Z options to modify the selinux label of the host file or directory being mounted into the container.
If you use selinux you can add the z or Z options to modify the selinux label of the host file or directory being mounted into the container.
-
The
zoption indicates that the bind mount content is shared among multiple containers. -
The
Zoption indicates that the bind mount content is private and unshared.
It is not possible to modify the selinux label using the --mount flag.
$ docker run -d \
  -it \
  --name devtest \
  -v "$(pwd)"/target:/app:z \ (1)
nginx:latest| 1 | 怎么看一下效果? |
Configure mount consistency for macOS
Docker Desktop for Mac uses osxfs to propagate directories and files shared from macOS to the Linux VM.
-
consistentordefault: The default setting with full consistency, as described above. -
delegated: The container runtime’s view of the mount is authoritative. There may be delays before updates made in a container are visible on the host. -
cached: The macOS host’s view of the mount is authoritative. There may be delays before updates made on the host are visible within a container.
$ docker run -d \
  -it \
  --name devtest \
  --mount type=bind,source="$(pwd)"/target,destination=/app,consistency=cached \ (1)
nginx:latest| 1 | 怎么验证一下? |
tmpfs mounts
If you’re running Docker on Linux, you have a third option: tmpfs mounts.
A tmpfs mount is temporary, and only persisted in the host memory.
This is useful to temporarily store sensitive files that you don’t want to persist in either the host or the container writable layer.
Limitations of tmpfs mounts
-
Unlike volumes and bind mounts, you can’t share tmpfs mounts between containers.
-
This functionality is only available if you’re running Docker on Linux.
The --mount syntax is more verbose than --tmpfs:
-
The
typeof the mount is alwaystmpfs. -
The
destinationtakes as its value the path where thetmpfsmount is mounted in the container. May be specified asdestination,dst, ortarget. -
The
tmpfs-typeoption — Size of the tmpfs mount in bytes. Unlimited by default. -
The
tmpfs-modeoption — File mode of the tmpfs in octal. For instance,700or0770. Defaults to1777or world-writable.
这里的 0777 和 1777 是什么意思?
|
-
The
--tmpfsflag does not allow you to specify any configurable options. -
The
--tmpfsflag cannot be used with swarm services. You must use--mount.
$ docker run -d \
  -it \
  --name tmptest \
  --mount type=tmpfs,destination=/app \
  nginx:latest

$ docker container inspect tmptest

$ docker container stop tmptest

$ docker container rm tmptest
$ docker run -d \
-it \
--name tmptest \
--mount type=tmpfs,destination=/app,tmpfs-mode=1770 \
nginx:lateststorage drivers
To use storage drivers effectively, it’s important to know how Docker builds and stores images, and how these images are used by containers.
Storage drivers allow you to create data in the writable layer of your container.
FROM ubuntu:15.04
COPY . /app
RUN make /app
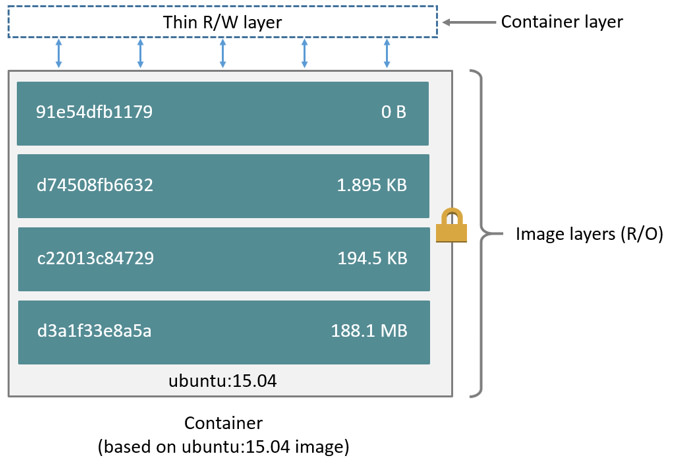
CMD python /app/app.pyEach layer is only a set of differences from the layer before it. The layers are stacked on top of each other. When you create a new container, you add a new writable layer on top of the underlying layers. This layer is often called the “container layer”.
A storage driver handles the details about the way these layers interact with each other.
The major difference between a container and an image is the top writable layer. All writes to the container that add new or modify existing data are stored in this writable layer. When the container is deleted, the writable layer is also deleted. The underlying image remains unchanged.
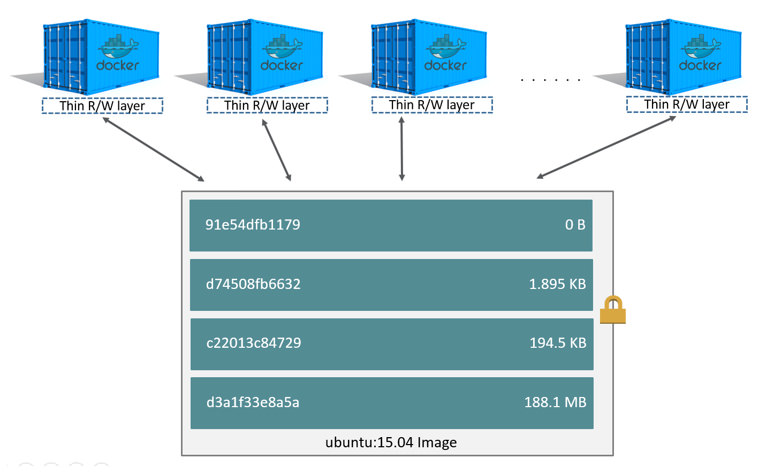
Because each container has its own writable container layer, and all changes are stored in this container layer, multiple containers can share access to the same underlying image and yet have their own data state.
Docker uses storage drivers to manage the contents of the image layers and the writable container layer. All drivers use stackable image layers and the copy-on-write (CoW) strategy.
Use the docker ps -s command to view the approximate size of a running container.
-
size: the amount of data (on disk) that is used for the writable layer of each container. -
virtual size: the amount of data used for the read-only image data used by the container plus the container’s writable layersize.
The total disk space used by all of the running containers on disk is some combination of each container’s size and the virtual size values. If multiple containers started from the same exact image, the total size on disk for these containers would be SUM (size of containers) plus one image size (virtual size - size).
-
Disk space used for log files if you use the
json-filelogging driver. -
Volumes and bind mounts used by the container.
-
Disk space used for the container’s configuration files.
-
Memory written to disk (if swapping is enabled).
-
Checkpoints, if you’re using the experimental checkpoint/restore feature.
The copy-on-write (CoW) strategy is a strategy of sharing and copying files for maximum efficiency. The first time another layer needs to modify the file (when building the image or running the container), the file is copied into that layer and modified.
each layer is pulled down separately, and stored in Docker’s local storage area, which is usually /var/lib/docker/ on Linux hosts.
Each of these layers is stored in its own directory inside the Docker host’s local storage area. To examine the layers on the filesystem, list the contents of /var/lib/docker/<storage-driver>/layers/.
The directory names do not correspond to the layer IDs (this has been true since Docker 1.10).
If you build images from the two Dockerfiles, you can use docker image ls and docker history commands to verify that the cryptographic IDs of the shared layers are the same.
-
Make a new directory
cow-test/and change into it. -
Within
cow-test/, create a new filehello.shwith the following contents:#!/bin/sh echo "Hello world"Save the file, and make it executable:
$ chmod +x hello.sh -
Create a new file called
Dockerfile.base.FROM ubuntu:latest COPY . /app -
Create another new file called
Dockerfile.FROM acme/my-base-image:1.0 CMD /app/hello.sh -
Within the
cow-test/directory, build the first image. Don’t forget to include the final.in the command. That sets thePATH, which tells Docker where to look for any files that need to be added to the image.$ docker build -t acme/my-base-image:1.0 -f Dockerfile.base . -
Build the second image.
$ docker build -t acme/my-final-image:1.0 -f Dockerfile . -
Check out the sizes of the images:
$ docker image ls REPOSITORY TAG IMAGE ID CREATED SIZE acme/my-final-image 1.0 e9df33dcd02a 7 minutes ago 88.9MB acme/my-base-image 1.0 af47138a5586 7 minutes ago 88.9MB -
Check out the layers that comprise each image:
$ docker history af47138a5586
IMAGE               CREATED             CREATED BY                                      SIZE                COMMENT
af47138a5586        8 minutes ago       /bin/sh -c #(nop) COPY dir:2b09a84bc07301dc5…   106B
94e814e2efa8        3 weeks ago         /bin/sh -c #(nop)  CMD ["/bin/bash"]            0B
<missing>           3 weeks ago         /bin/sh -c mkdir -p /run/systemd && echo 'do…   7B
<missing>           3 weeks ago         /bin/sh -c rm -rf /var/lib/apt/lists/*          0B
<missing>           3 weeks ago         /bin/sh -c set -xe   && echo '#!/bin/sh' > /…   745B
<missing>           3 weeks ago         /bin/sh -c #(nop) ADD file:1d7cb45c4e196a6a8…   88.9MB
$ docker history e9df33dcd02a IMAGE CREATED CREATED BY SIZE COMMENT e9df33dcd02a 2 hours ago /bin/sh -c #(nop) CMD ["/bin/sh" "-c" "/app… 0B af47138a5586 2 hours ago /bin/sh -c #(nop) COPY dir:2b09a84bc07301dc5… 106B 94e814e2efa8 3 weeks ago /bin/sh -c #(nop) CMD ["/bin/bash"] 0B <missing> 3 weeks ago /bin/sh -c mkdir -p /run/systemd && echo 'do… 7B <missing> 3 weeks ago /bin/sh -c rm -rf /var/lib/apt/lists/* 0B <missing> 3 weeks ago /bin/sh -c set -xe && echo '#!/bin/sh' > /… 745B <missing> 3 weeks ago /bin/sh -c #(nop) ADD file:1d7cb45c4e196a6a8… 88.9MBNotice that all the layers are identical except the top layer of the second image. All the other layers are shared between the two images, and are only stored once in
/var/lib/docker/.The <missing>lines in thedocker historyoutput indicate that those layers were built on another system and are not available locally. This can be ignored.
Copying makes containers efficient
When you start a container, a thin writable container layer is added on top of the other layers. Any changes the container makes to the filesystem are stored here.
When an existing file in a container is modified, the storage driver performs a copy-on-write operation.
For the aufs, overlay, and overlay2 drivers, the copy-on-write operation follows this rough sequence:
-
Search through the image layers for the file to update. The process starts at the newest layer and works down to the base layer one layer at a time. When results are found, they are added to a cache to speed future operations.
-
Perform a
copy_upoperation on the first copy of the file that is found, to copy the file to the container’s writable layer. -
Any modifications are made to this copy of the file, and the container cannot see the read-only copy of the file that exists in the lower layer.
| for write-heavy applications, you should not store the data in the container. Instead, use Docker volumes. |
-
Docker 镜像依赖具体的 Storage Driver 吗?在 Ubuntu 上制作的镜像可以在 CentOS 上运行吗?
??
Check docker container size:
-
run the following
docker runcommands.$ docker run -dit --name my_container_1 acme/my-final-image:1.0 bash \ && docker run -dit --name my_container_2 acme/my-final-image:1.0 bash \ && docker run -dit --name my_container_3 acme/my-final-image:1.0 bash \ && docker run -dit --name my_container_4 acme/my-final-image:1.0 bash \ && docker run -dit --name my_container_5 acme/my-final-image:1.0 bash -
Run the
docker pscommand to verify the 5 containers are running.$ docker ps CONTAINER ID IMAGE COMMAND CREATED STATUS PORTS NAMES 674b7919904b acme/my-final-image:1.0 "bash" 3 minutes ago Up 3 minutes my_container_5 42a4a0d0623e acme/my-final-image:1.0 "bash" 3 minutes ago Up 3 minutes my_container_4 59fc52e441b7 acme/my-final-image:1.0 "bash" 3 minutes ago Up 3 minutes my_container_3 a71d6d72d431 acme/my-final-image:1.0 "bash" 3 minutes ago Up 3 minutes my_container_2 04372919d606 acme/my-final-image:1.0 "bash" 3 minutes ago Up 3 minutes my_container_1 -
List the contents of the local storage area.
$ sudo ls /var/lib/docker/containers 04372919d60611472092a0c67ac37727d882c4540688a7582bfa1b03498b9d00 42a4a0d0623e35b13eb8bc00ee360ee2e2eb1ff2b9d61162aa0e87c54ca98c7c 59fc52e441b7574f5bd7879833dad5d35b1bd778efccd10aa17650fcee3870a2 674b7919904b90995d2f41cc056cedc98e42162fbe6a49b7d41338b8c582b966 a71d6d72d431d595c81dd0f88fab49c97f08ebc63300dbc9ffe8f503a297d82a -
Now check out their sizes:
# du -sh /var/lib/docker/containers/* (1)
36K	/var/lib/docker/containers/04372919d60611472092a0c67ac37727d882c4540688a7582bfa1b03498b9d00
36K	/var/lib/docker/containers/42a4a0d0623e35b13eb8bc00ee360ee2e2eb1ff2b9d61162aa0e87c54ca98c7c
36K	/var/lib/docker/containers/59fc52e441b7574f5bd7879833dad5d35b1bd778efccd10aa17650fcee3870a2
36K	/var/lib/docker/containers/674b7919904b90995d2f41cc056cedc98e42162fbe6a49b7d41338b8c582b966
36K	/var/lib/docker/containers/a71d6d72d431d595c81dd0f88fab49c97f08ebc63300dbc9ffe8f503a297d82a
1 使用普通账户,竟然显示没有权限。所以,只能切换成 root权限来搞。Each of these containers only takes up 32k of space on the filesystem.
Not only does copy-on-write save space, but it also reduces start-up time.

