快速入门
Images and containers
A container is launched by running an image. An image is an executable package that includes everything needed to run an application—the code, a runtime, libraries, environment variables, and configuration files.
A container is a runtime instance of an image—what the image becomes in memory when executed (that is, an image with state, or a user process). You can see a list of your running containers with the command, docker ps, just as you would in Linux.
Containers and virtual machines
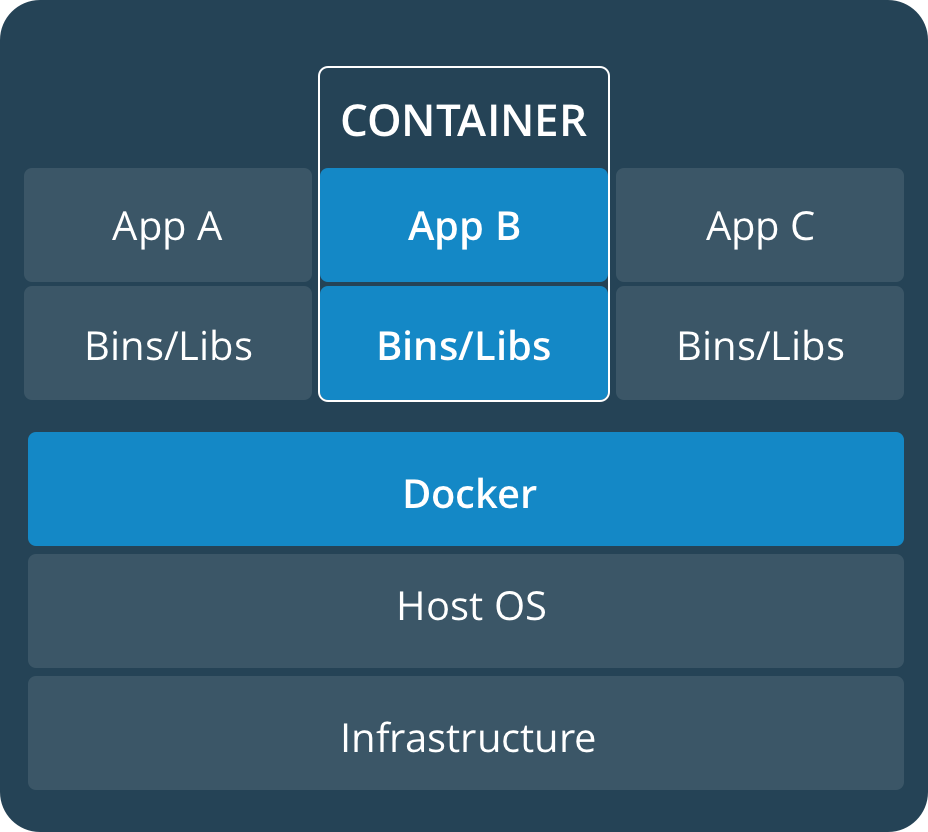
A container runs natively on Linux and shares the kernel of the host machine with other containers. It runs a discrete process, taking no more memory than any other executable, making it lightweight.
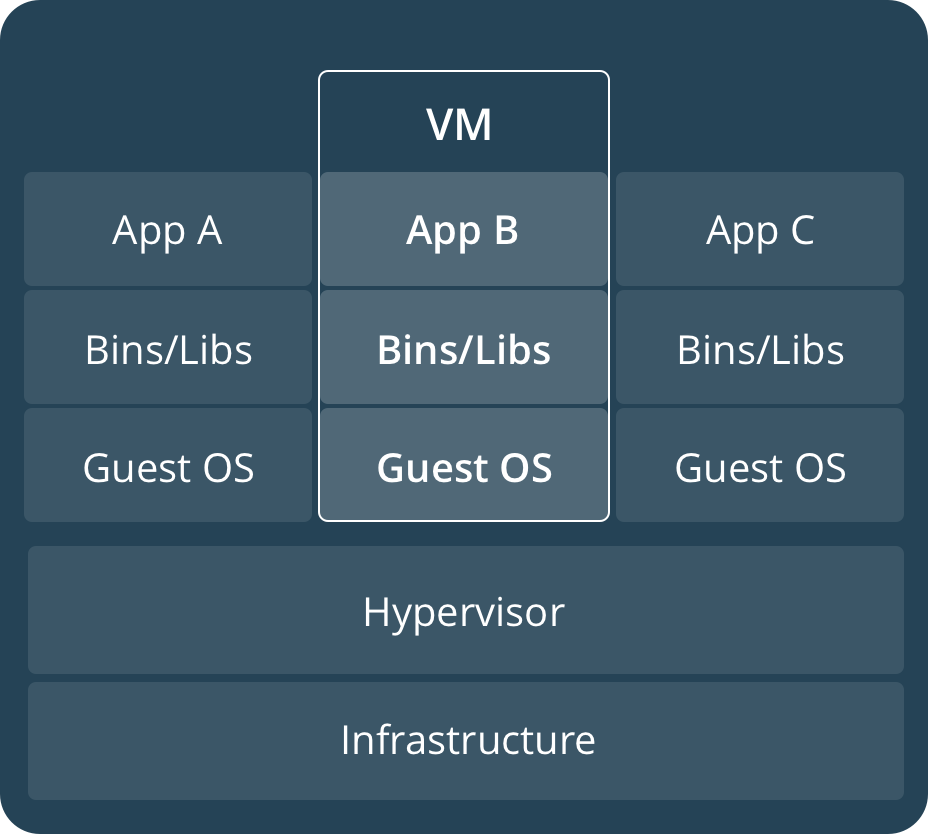
By contrast, a virtual machine (VM) runs a full-blown “guest” operating system with virtual access to host resources through a hypervisor. In general, VMs provide an environment with more resources than most applications need.


# 查看 docker 版本,版本的简要信息
docker --version

# 查看 docker 版本详细信息
docker version

# 查看 docker 基本信息,挺详细
# Display system-wide information
docker info

# 运行 image
docker run hello-world

# 查看已经下载的 image
docker image ls

# 查看所有的 container(包含已经执行完成的)
docker container ls --all


## List Docker CLI commands
docker
docker container --help

## Display Docker version and info
docker --version
docker version
docker info

## Execute Docker image
docker run hello-world

## List Docker images
docker image ls

## List Docker containers (running, all, all in quiet mode)
docker container ls
docker container ls --all
docker container ls -aq
Dockerfile
Dockerfile defines what goes on in the environment inside your container. Access to resources like networking interfaces and disk drives is virtualized inside this environment, which is isolated from the rest of your system, so you need to map ports to the outside world, and be specific about what files you want to “copy in” to that environment.
Unresolved include directive in modules/ROOT/pages/get-started.adoc - include::example$01-get-started/Dockerfile[]docker build --tag=01-friendlyhello .
docker image lsdocker run -p 4000:80 01-friendlyhello
# 后台运行
docker run -d -p 4000:80 01-friendlyhello
docker container ls
# 停止指定容器
docker container stop <ContainerId>
# 登录
docker login
# 给指定 image 打 tag
docker tag image username/repository:tag
docker tag 01-friendlyhello diguage/01-get-started:part2
docker image ls
# Publish the image
docker push username/repository:tag
docker push diguage/01-get-started:part2
# Pull and run the image from the remote repository
docker run -p 4000:80 username/repository:tagA registry is a collection of repositories, and a repository is a collection of images—sort of like a GitHub repository, except the code is already built.
No matter where docker run executes, it pulls your image, along with Python and all the dependencies from requirements.txt, and runs your code.
Compose
| TODO:这部分回头使用 Kubernetes 相关内容重做一遍。 |
Services are really just “containers in production.” A service only runs one image, but it codifies the way that image runs—what ports it should use, how many replicas of the container should run so the service has the capacity it needs, and so on.
version: "3"
services:
  web:
    image: diguage/01-get-started:part2
    deploy:
      replicas: 5
      resources:
        limits:
          cpus: "0.1"
          memory: 50M
      restart_policy:
        condition: on-failure
    ports:
      - "4000:80"
    networks:
      - webnet
networks:
  webnet:
docker swarm init
docker stack deploy -c docker-compose.yml getstartedlab
docker service ls
# view all services associated with the getstartedlab stack:
docker stack services getstartedlab
# List the tasks for your service:
docker service ps getstartedlab_web
# 仅仅列出 Container ID
docker container ls -q
# 查看状态
docker stack ps getstartedlab
# Scale the app: 修改副本数量。
docker stack deploy -c docker-compose.yml getstartedlab
# 扩容的时候为什么要杀掉原来的 container?有业务正在处理的节点是怎么处理的?
# Take the app down
docker stack rm getstartedlab
# Take down the swarm.
docker swarm leave --forceA single container running in a service is called a task.
-
使用
docker service ps getstartedlab_web与docker container ls -q中输出的 ID,为什么不同?有何关系???
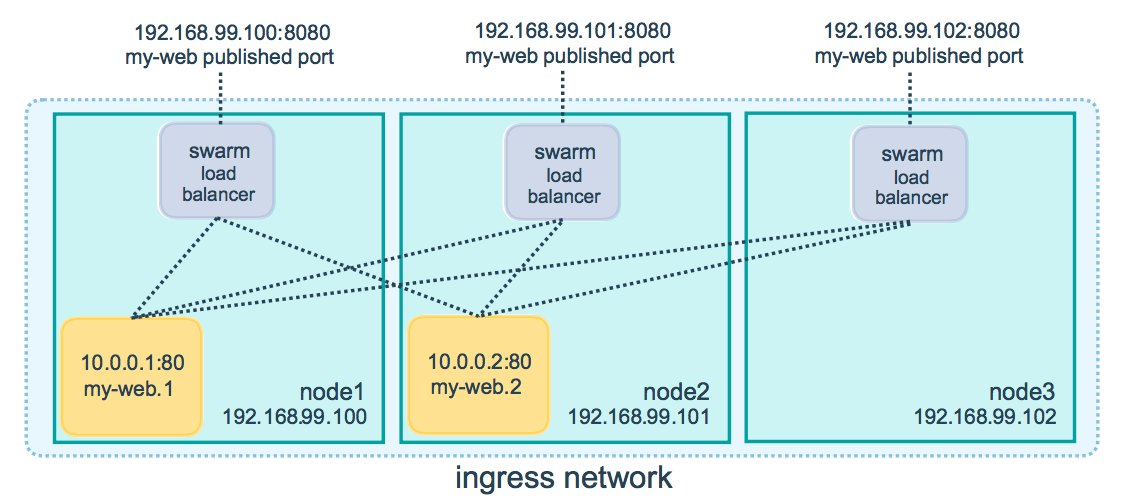
with each request, one of the 5 tasks is chosen, in a round-robin fashion, to respond.
Swarm
-
swarm
-
swarm manager
-
node
-
worker
-
swarm mode
# 创建 machine
docker-machine create --driver virtualbox myvm1
docker-machine create --driver virtualbox myvm2


docker-machine ls

# 设置 manager 节点
docker-machine ssh myvm1 "docker swarm init --advertise-addr <myvm1 ip>"
# 输出时,会含有如下命令
docker swarm join --token SWMTKN-1-5dbcodziijckk71tyfayg7ihm4tul2q57974xnf7akx4jmi6qy-6hlxao9pt2bi8as94k4uysqn0 192.168.99.100:2377

# 这里的 Token 是由上面生成的。
docker-machine ssh myvm2 "docker swarm join --token SWMTKN-1-5dbcodziijckk71tyfayg7ihm4tul2q57974xnf7akx4jmi6qy-6hlxao9pt2bi8as94k4uysqn0 192.168.99.100:2377"

# Run `docker node ls` on the manager to view the nodes in this swarm:
docker-machine ssh myvm1 "docker node ls"

# TODO  如何离开?
// If you want to start over, you can run docker swarm leave from each node. 这句话怎么理解?
// docker-machine ssh myvm1 "docker swarm leave"

# 配置
$ docker-machine env myvm1
export DOCKER_TLS_VERIFY="1"
export DOCKER_HOST="tcp://192.168.99.100:2376"
export DOCKER_CERT_PATH="/Users/diguage/.docker/machine/machines/myvm1"
export DOCKER_MACHINE_NAME="myvm1"
# Run this command to configure your shell:
# eval $(docker-machine env myvm1)

# 执行这条命令配置 Shell
eval $(docker-machine env myvm1)

# 现在 myvm1 被激活了
docker-machine ls

# 部署应用(上文中的端口号是 4000:80,这里保持不变。官方文档中漏提了需要修改端口号。)
docker stack deploy -c docker-compose.yml getstartedlab

# 如果成功的话,这可以也看到 副本集 分子和分母相等。
docker service ls

# 访问
curl http://192.168.99.100:4000
# 每次 `docker-machine create` IP 地址会增加

# 删除
docker stack rm getstartedlab

# 清除配置
eval $(docker-machine env -u)

# 启动
docker-machine start <machine-name>

# 删除
docker-machine rm <machine-name>| 管理永远是 2377 端口, |

这里出了个问题,排除思路:
-
为了方便下面的命令执行,先配置
docker-macine-
执行
docker-machine env myvm1$ docker-machine env myvm1 export DOCKER_TLS_VERIFY="1" export DOCKER_HOST="tcp://192.168.99.102:2376" export DOCKER_CERT_PATH="/Users/diguage/.docker/machine/machines/myvm1" export DOCKER_MACHINE_NAME="myvm1" # Run this command to configure your shell: # eval $(docker-machine env myvm1) -
执行最后一句命令
$ eval $(docker-machine env myvm1)
-
-
通过
docker-machine ls查看机器 IP$ docker-machine ls NAME ACTIVE DRIVER STATE URL SWARM DOCKER ERRORS myvm1 * virtualbox Running tcp://192.168.99.102:2376 v18.09.3 myvm2 - virtualbox Running tcp://192.168.99.103:2376 v18.09.3 -
获得机器 IP 后,测试网络是否通
$ ping 192.168.99.102 PING 192.168.99.102 (192.168.99.102): 56 data bytes 64 bytes from 192.168.99.102: icmp_seq=0 ttl=64 time=0.294 ms 64 bytes from 192.168.99.102: icmp_seq=1 ttl=64 time=0.256 ms 64 bytes from 192.168.99.102: icmp_seq=2 ttl=64 time=0.222 ms 64 bytes from 192.168.99.102: icmp_seq=3 ttl=64 time=0.405 ms -
由于这是个 Web 服务,则可以通过
curl http://192.168.99.102:4000查看是否正常。如果不能正常访问,则继续排除。 -
网络连通是 OK 的话,查看端口是否 OK,两个方式
-
使用
netstat -nl | grep 4000查看$ netstat -nl | grep 4000 tcp4 0 0 192.168.99.1.56411 192.168.99.103.4000 ESTABLISHED (1) tcp4 0 0 192.168.99.1.56393 192.168.99.102.4000 TIME_WAIT1 如果没有相应的输出,则说明有问题。 -
使用
telnet 192.168.99.102 4000$ telnet 192.168.99.102 4000 Trying 192.168.99.102... (1) Connected to 192.168.99.102. Escape character is '^]'.1 如果端口有问题,这里直接就是提示 Connection refused拒绝访问。
-
-
通过
docker node ls检查节点的状态$ docker node ls ID HOSTNAME STATUS AVAILABILITY MANAGER STATUS ENGINE VERSION mz2uqy5vjvju068uprw67z1ph * myvm1 Ready Active Leader 18.09.3 qww7x5a3836hnc8d4zx9kih4t myvm2 Ready Active 18.09.3 -
通过
docker stack ps getstartedlab查看服务的状态$ docker stack ps getstartedlab ID NAME IMAGE NODE DESIRED STATE CURRENT STATE ERROR PORTS ndbmgp8wlvp0 getstartedlab_web.1 diguage/01-get-started:part2 myvm1 Running Running 27 minutes ago (1) 2m1aqlr4m5i6 \_ getstartedlab_web.1 diguage/01-get-started:part2 myvm1 Shutdown Shutdown 27 minutes ago 5xr4nmwo2ffd \_ getstartedlab_web.1 diguage/01-get-started:part2 myvm1 Shutdown Shutdown 28 minutes ago kxrtfmlkku1l \_ getstartedlab_web.1 diguage/01-get-started:part2 myvm2 Shutdown Shutdown 30 minutes ago jafp5uppesjv getstartedlab_web.2 diguage/01-get-started:part2 myvm2 Running Running 26 minutes ago nepxly7zcxss \_ getstartedlab_web.2 diguage/01-get-started:part2 myvm2 Shutdown Shutdown 26 minutes ago tl396s3vp7pr \_ getstartedlab_web.2 diguage/01-get-started:part2 myvm2 Shutdown Shutdown 28 minutes ago conj00k1q32t \_ getstartedlab_web.2 diguage/01-get-started:part2 myvm2 Shutdown Shutdown 30 minutes ago exg8je3dt558 getstartedlab_web.3 diguage/01-get-started:part2 myvm1 Running Running 26 minutes ago tqqrhqm93fs6 \_ getstartedlab_web.3 diguage/01-get-started:part2 myvm1 Shutdown Shutdown 26 minutes ago oynsvvfhznxq \_ getstartedlab_web.3 diguage/01-get-started:part2 myvm1 Shutdown Shutdown 28 minutes ago zg7togioehbp \_ getstartedlab_web.3 diguage/01-get-started:part2 myvm1 Shutdown Shutdown 30 minutes ago seej60hjmndw getstartedlab_web.4 diguage/01-get-started:part2 myvm2 Running Running 26 minutes ago etj0r1xo2cv8 \_ getstartedlab_web.4 diguage/01-get-started:part2 myvm2 Shutdown Shutdown 26 minutes ago ozxn96kokvd1 \_ getstartedlab_web.4 diguage/01-get-started:part2 myvm2 Shutdown Shutdown 28 minutes ago yrpxcuhxt3bo getstartedlab_web.5 diguage/01-get-started:part2 myvm1 Running Running 27 minutes ago1 这个服务测试过扩缩容,所以多了一些关闭状态。 -
通过
docker service ls来查看服务状态$ docker service ls ID NAME MODE REPLICAS IMAGE PORTS mb300tn4cqp2 getstartedlab_web replicated 5/5 diguage/01-get-started:part2 *:4000->80/tcp (1)1 注意这里的 REPLICAS项。正常状态下,分子分母一样。如果出现0/5这表示服务状态异常。 -
可以通过
docker-machine ssh myvm1进去到machine去查看container的状态。$ docker-machine ssh myvm1 ( '>') /) TC (\ Core is distributed with ABSOLUTELY NO WARRANTY. (/-_--_-\) www.tinycorelinux.net docker@myvm1:~$ (1)1 以下命令请注意每个命令行开头的用户名和所在机器。 -
通过
docker container ls查看container的状态docker@myvm1:~$ docker container ls CONTAINER ID IMAGE COMMAND CREATED STATUS PORTS NAMES 516d1ccb23c7 diguage/01-get-started:part2 "python app.py" 32 minutes ago Up 32 minutes 80/tcp getstartedlab_web.3.exg8je3dt5586l7hgt8xvafuz (1) 39a0f3cd0e77 diguage/01-get-started:part2 "python app.py" 33 minutes ago Up 33 minutes 80/tcp getstartedlab_web.5.yrpxcuhxt3bojd2h9i41mjjci 337a364ef099 diguage/01-get-started:part2 "python app.py" 33 minutes ago Up 33 minutes 80/tcp getstartedlab_web.1.ndbmgp8wlvp0ru88e4lwj5art1 异常情况下,可能没有 container信息。 -
通过
docker images查看镜像状态docker@myvm1:~$ docker images REPOSITORY TAG IMAGE ID CREATED SIZE diguage/01-get-started <none> 13e8d6379f20 38 hours ago 153MB (1)1 异常情况下,可能没有镜像信息
Stacks
-
stack — A stack is a group of interrelated services that share dependencies, and can be orchestrated and scaled together.
# 修改 docker-compose.yml 增加服务定义,然后发布
docker stack deploy -c docker-compose.yml getstartedlab

# 查看服务状态
docker stack services getstartedlab

# 查看服务中的容器状态
docker stack ps getstartedlab

# 部署 Redis 之前,需要在 manager 节点创建相关目录
docker-machine ssh myvm1 "mkdir ./data"

# 关闭服务
docker stack rm getstartedlab
查看 Web 页面,确认服务状态
version: "3"
services:
  web:
    image: diguage/01-get-started:part2
    deploy:
      replicas: 5
      resources:
        limits:
          cpus: "0.1"
          memory: 50M
      restart_policy:
        condition: on-failure
    ports:
      - "4000:80"
    networks:
      - webnet
  visualizer:
    image: dockersamples/visualizer:stable
    ports:
      - "8080:8080"
    volumes:
      - "/var/run/docker.sock:/var/run/docker.sock"
    deploy:
      placement:
        constraints: [node.role == manager]
    networks:
      - webnet
networks:
  webnet:
增加 Redis 服务
# 部署 Redis 之前,需要在 manager 节点创建相关目录
docker-machine ssh myvm1 "mkdir ./data" (1)| 1 | 通过这里也可以看出,是在 myvm1 内部启动了 Docker container。 |
version: "3"
services:
  web:
    image: diguage/01-get-started:part2
    deploy:
      replicas: 5
      resources:
        limits:
          cpus: "0.1"
          memory: 50M
      restart_policy:
        condition: on-failure
    ports:
      - "4000:80"
    networks:
      - webnet
  visualizer:
    image: dockersamples/visualizer:stable
    ports:
      - "8080:8080"
    volumes:
      - "/var/run/docker.sock:/var/run/docker.sock"
    deploy:
      placement:
        constraints: [node.role == manager]
    networks:
      - webnet
  redis:
    image: redis
    ports:
      - "6379:6379"
    volumes:
      - "/home/docker/data:/data"
    deploy:
      placement:
        constraints: [node.role == manager]
    command: redis-server --appendonly yes
    networks:
      - webnet
networks:
  webnet:
